Sunday, January 30, 2011

14: Key and Fill Edges

If you consider the body topology I have designed for my character. You might wonder why the topology is lined up the way it is. If you remember all 3d models are created with a specific purpose in mind and If you look at my character and think about how it is expected to move. You will see that some edges line up with where the body will bend and others where the body gets fat or thins out. These are called key and fill edges

1. Key edges are those that will be bending or controlling a bend.
These usually have the bone axis point sitting under them.

2. Fill edges are those that fill out or help shape muscle or body bulk but don't deform majorly when the bone moves underneath.

Design your characters with the key edges in mind first.


13: The Importance Of Pre Production

You may have heard this term before. What its about is the pre-planning stage of any production. It is a part of the big picture in any production pipeline. That pipeline consisting of 3 main stages -- Pre Production , Production and Post Production. In the pre production stage of our model there are many things to consider. One of them being how the mesh should be able to deform, another how the mesh should be controlled and another how the mesh should be textured.

Pre Production Is Like Training

So far in the tutorials you have been following you have.

1. Learned the basics of the interface.

Of course this is not everything you need to understand about blender but its a good start. As this lesson plan progresses you will be learning lighting, texturing, staging and animation. You will build your skills related to different tasks. Your knowledge and use of the interface will increase.

2. You have learned about the power of modifiers. Very important if you are going to plan some unique animated sequences.

3. And you have learned about standard box modeling to build a couple of basic objects.

All of this was pre production to building your knowledge for future projects.
So pre production is about understanding the basics of the project in front of you.
The character you are about to build and animate requires pre production too.


So What Is Next?

Next is three simple pre production steps.

1. Design mock ups and the T Pose to aid in building characters.

2. A knowledge of how your characters move and how to design the edge loops in order to get the mesh working properly. - So in the case of my character. I want the character to walk, talk and do some basic acting. I may require squash and stretch ability. I also would like his arms and legs to be able to stretch sometimes. I know these things because I have visualized my character moving and acting. You will need to visualize your own characters moving and build a list of expected movements.

If you ever work with a director you should ask questions about how the character is expected to react and behave. These simple questions can give you a real insight into how the mesh will be expected to deform. Don't be surprised if you need to build two or more versions of the character to get the expected look.

3. A knowledge of how to utilize skills to make the character become a reality. Think about what you know and what you can achieve with that knowledge. Don't fear to learn something new. Once upon a time I had no experience with particle animation. But a job I was booked for required that I learn particles. Knowing this in advance allowed me to work out the time it would take to learn this and include it into a quote for that client.

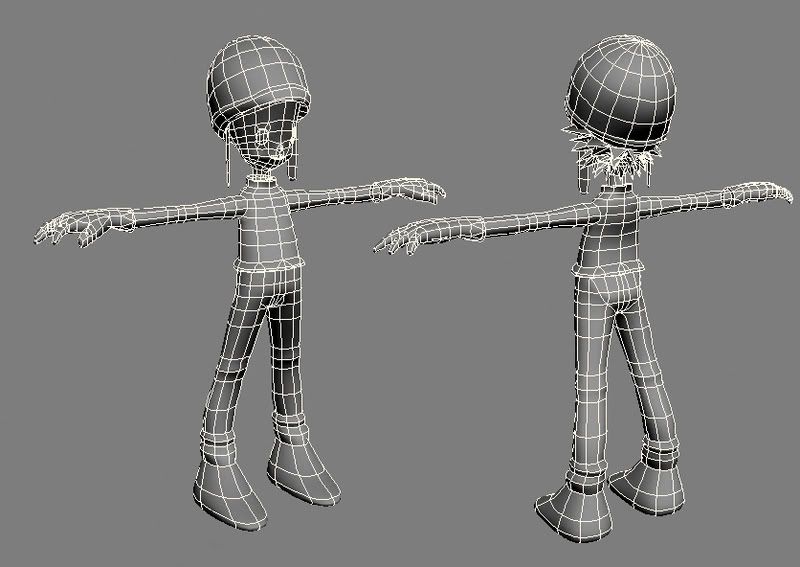
So here is my next stage in the pre production process. My edge loop study of the body and the head. I have taken inspiration from this edge loop design to the right of my drawing.


Monday, January 17, 2011

12: Character T Pose


So we are now getting ready to build an articulate character. One that can walk and talk. To achieve this, first design a character and draw him in the "T" pose with a front and side view. The "T" is a standard pose for a biped character. The arms are not straight out, but slightly bent downwards and the feet are not quite together but set slightly apart with the toes pointing slightly outward in an at ease stance. I have taken the liberty of creating this "T" posed character to make it easy for those who don't draw yet. Just right mouse click the image and choose save image as. You will use both the Front and Side views in Blender to load in this image to use as a reference image. If you have forgotten how this is done go to lesson 7 and follow the tutorial.


Sunday, January 16, 2011

11: Even more on design.

It may seem like I am going on and on about the design aspect of 3D character model building. But the fact is, a badly designed model is a real pain to animate with. You may as well get it right the first time and build a great model and your expertise rather than clumsily fix a bad model. When considering your characters you should be thinking about how they deform as they move and be designing to allow for those movements. The way to do this is with a well defined edge loop design. Edge loops are a design principle that allows for light weight poly models and maximum deformation flexibility.


In this really easy to follow tutorial about edge loops Athey Nansel-Moravetz explains how to go about designing your characters to have good edge loop integration. The idea being that you will be able to create guide images to load into your front and side views in Blender and build your mesh to suit the design.
Here again you can see a nicely planed edge loop layout in this body for a Street Cop in this tutorial by Mashru Mish. He has evenly spaced the edges and kept the joint quads divided at the bend these are the key edges. Also there are support quads and edges called fills that are closer to the bend. These are placed around the key edges in order to stop deformation flowing too far up or down the leg and arm joints.

Thursday, January 13, 2011

10: Less and More

Some helpful points before you build your own 3D character.

Less before best:

Generally when building a model it is best to plan it before you build it. This often requires researching the work of others and adapting what you learn into your project plan. One thing I have learned over the years is that its best to start with less detail in your 3D models and add more as you require it. High poly models are not high poly to begin with. There is usually a process of building up detail slowly and carefully.

Others know best:

Before you embark on your first character model I suggest you take a look at some character models built by successful 3D experts in order to get a feel for your own models development. Here for example is a great head building tutorial for 3DS Max. I am including this here as a visual guide to design, rather than a software guide.


Start simple and builds skills:


From my experience with students frustration and flops. Not to mention my own. I understand that an over eager mind leads to many failures and that a consistent and slow accumulation of knowledge leads to fabulous results for future growth. Don't go at it like a bull at a gate! Learn things slowly and review everything. It will soon become second nature.

Tuesday, January 11, 2011

9: Know Your Body

When I was lecturing, one of the creative limitations I found with students was a lack of knowledge about the anatomy of movement. They would build characters and creatures that looked ok. But more often than not they built them with meshes that popped and deformed badly. This was not due to the modifiers and underlying deformers being incapable of controlling vertices. But was because the students lacked knowledge about how the model should deform prior to building the mesh. My solution was to take a break from software education and begin an education in character design and movement. I utilized a couple of books to do this. I am not suggesting that you buy these books but I believe its nice to have your own copy. You could however get these ordered in at your library. I hope people out there have access to one. If you don't I will try to find decent links to similar information and stick them in the TFAS library.

The first book is:

Preston Blair's Cartoon Animation

Cartoon Animation (Collectors S.)

Blair created some of the easiest to follow guides to animating characters and the detailed movement description and images provided in his books are a boon to understanding animation and character design. You should pay attention to the ways the characters are expected to move.


Another was :

Game Character Design Complete

Game Character Design Complete: Using 3ds Max 8 and Adobe Photoshop CS2

Although this book describes how to use 3DS Max to build the characters. The processes are exactly the same in any 3D software. If you utilize this knowledge in blender you will create models that don't screw up when you animate them.

Another really great thing to do is check out how others have designed their character meshes. You will soon get a really good feel for the shapes and designs you will require to get your character animating without deformation.
There are stacks of forums around that have members showing off there creations

8: The Cup Exercise

Ok you are nearly ready to build an articulated character. There is just a couple of small things to learn. They are adding detail using slices, deleting faces and welding vertexes. Also subdividing faces and adding materials and lights. You will learn these processes in the tutorial by the guys at New Zealand Viewfinder. This simple cup exercise will give you beneficial skills for future projects.

Monday, January 10, 2011

7: Reference images

The next very important thing to learn on the road to becoming a 3D animator is loading reference images as backgrounds. This helps you with getting proportions right. If you are a good drafts-person, this skill will separate you from the rest. As drawing is a real help as an animator. Without drawing as a skill you are not as valued in the animation business as those who can draw. Drawing can be learned though and if you are keen to learn you should look at books like Stan Lee's How to Draw Comics. In this next step you will be able to import a reference image that will give you something to guide you in the creation of characters/models.


This is another very informative tutorial

6: Your first extruded cube model


The extrude cube model will be the basis for all characters and complex models you create as a 3D animator. Although there are a number of other ways to build articulated characters. This process is by far the quickest and easiest to control.
I really suggest that before launching in and creating a character to animate. You try your skills building some simple objects. The tutorial here at katsbits.com is a really good exercise. It will give you a great feel for all the basic processes for building complex objects. Nearly all objects you create from this point on will reference these processes.

Sunday, January 9, 2011

5: (a) Other Camera Stuff

Ira Krakow runs through some useful tips about Blenders camera. For anybody with experience in camera settings in Max or Maya this is a very useful set of instructions. Though Ira doesn't seem to be too into it.

5: A camera with a look at

Cameras in blender are a little on the vanilla side, just a plain old camera. For nearly all animations you need something more and that's a camera that has a look at point. This tutorial by Blender Nuggets will show you how to set up a camera and change it to have a look at point.

4: The Most Powerfull Modifiers

Although all animators have different techniques and styles. Its undoubted that they use similar sets of tools to do their work in 3D applications. The most popular for deforming a character/model would be latices and bones. All the other modifiers are also useful but none so as these two.

First: The Lattice.

Consider your objects in 3D as a kind of wire mesh that can be manipulated at the very points that one piece of wire joins another. This is known as a vertex.
In blender you choose this level by selecting edit mode and then the vertex select icon. The next level up is edge mode - The wire itself. In blender you choose this level by selecting edit mode and then the edge select icon. Finally the level before object mode is face mode. In blender you choose this level by selecting edit mode and then the face select icon. It is important to note that at the vertex level you can group and name the group. Once a group is created modifiers can be added that will allow the animator to manipulate the character/model while setting key frames. This is how an animator can achieve minute detail in an expression.

In this tutorial the tutor is selecting a collection of vertex, grouping them and then applying a lattice modifier. A lattice is like an external force field that will push and pull your model in a multitude of directions. Once applied to groupings of vertex you can use it to pull only small parts of your model. This is great for animating mouths and eyelids.


Second Bones:

By far the most utilized deformer is the bone. Bones are of course internal to your model and deform your model within a given area. This is much like a force field emanating from the bone itself. You can use a bone in a similar way to the lattice but as a rule the bone has a parent child relationship to other bones. This means that one bone has control over another. Much the same way your arm has control of where your hand is and your hand has control over your fingers.
( Arm-Parents > Hand-Parents > Fingers )

It is by this process that you can build very complex animatable models.


3: Build a simple scene

It may seem a really boring way to start out, but creating a really simple scene will give you a feel for Blenders interface and how to carry out a set of commonly used tasks. As far as my own tuition in Blender, Super3Boy has been a very helpful contributer. I believe this tutorial will be a useful start for the novice.

Saturday, January 8, 2011

2: Modifiers the heart and soul of animation

One area of any 3d animation software that you should really become used to working with is the modifier section. You will use these tools more often to resolve issues related to building your objects and characters and getting parts to animate. These tools are second only to the transform tools ( Move, Rotate & Scale ).
Again one of the best tutorials comes from Oliver Villar Diz at Blendtuts.com

Blender 2.5 - How to use modifiers from Oliver Villar Diz on Vimeo.

1: Learn the Interface

The tutorial below is a fantastic place to start. The guys at Blendtuts have loads of really great tutorials some of which I am bound to link to from time to time. But I will be very selective about the tutorials I choose, as this blog is a device to teach the novice on a step by step process. I will collect the best tutorials from the net and deliver them as a lesson by lesson system similar to a university or specialist college.This video tutorial by Oliver Villar Diz, is in my opinion one of the best Blender interface tutorials around.

AND WHO AM I ?

My background is that of a professional animator both 2D and 3D. I have worked for Disney, Nickelodeon and the BBC to name a few. I have been a lecturer at University and still work in motion graphics and animation in New Zealand.

Generally before starting any animating or learning about animation you need to understand the tools you are using, their importance and the navigation from one set of tools to the next. This video bellow pretty much does all of those things for the Blender software. This blog is designed to be navigable, if you know this stuff already you can simply review and move on.

By the way if you don't have Blender yet you can get it here


Blender 2.5 - Basic Interface from Oliver Villar Diz on Vimeo.


Another very good beginners tutorial is this one by PentaKackleAnimation. This tute gives some extra detail and will also give you details on where to download Blender 3D